The first stage in making (and designing) clothes is to take accurate measurements.
Diagrams and text provided by Alison Peck.
Most of the measurements you need do not change regardless of the style of garment.
What does change is the amount of ‘ease’ (extra to allow for ease of movement and flow of garment) but body measurements are usually the minimum size (with very few exceptions). For example, a person’s arm length is fixed, but sleeve length and the position of the shoulder seam will differ considerably between a fitted sleeve and a drop-shoulder garment.
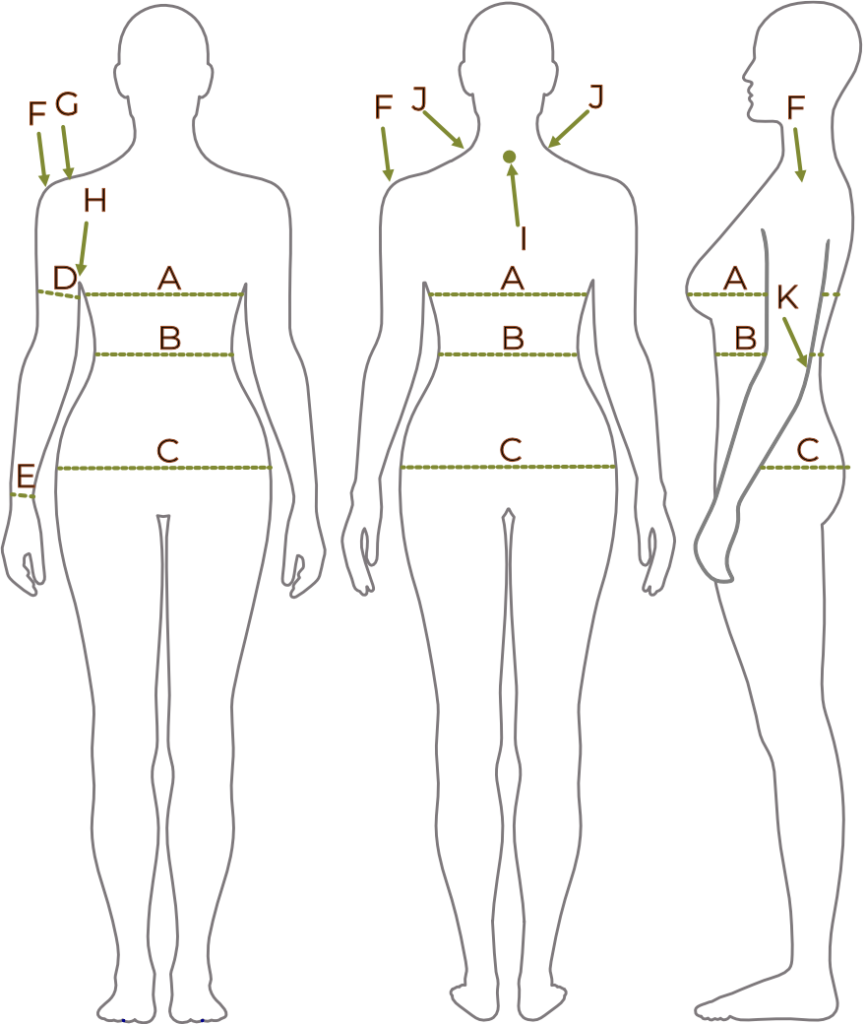
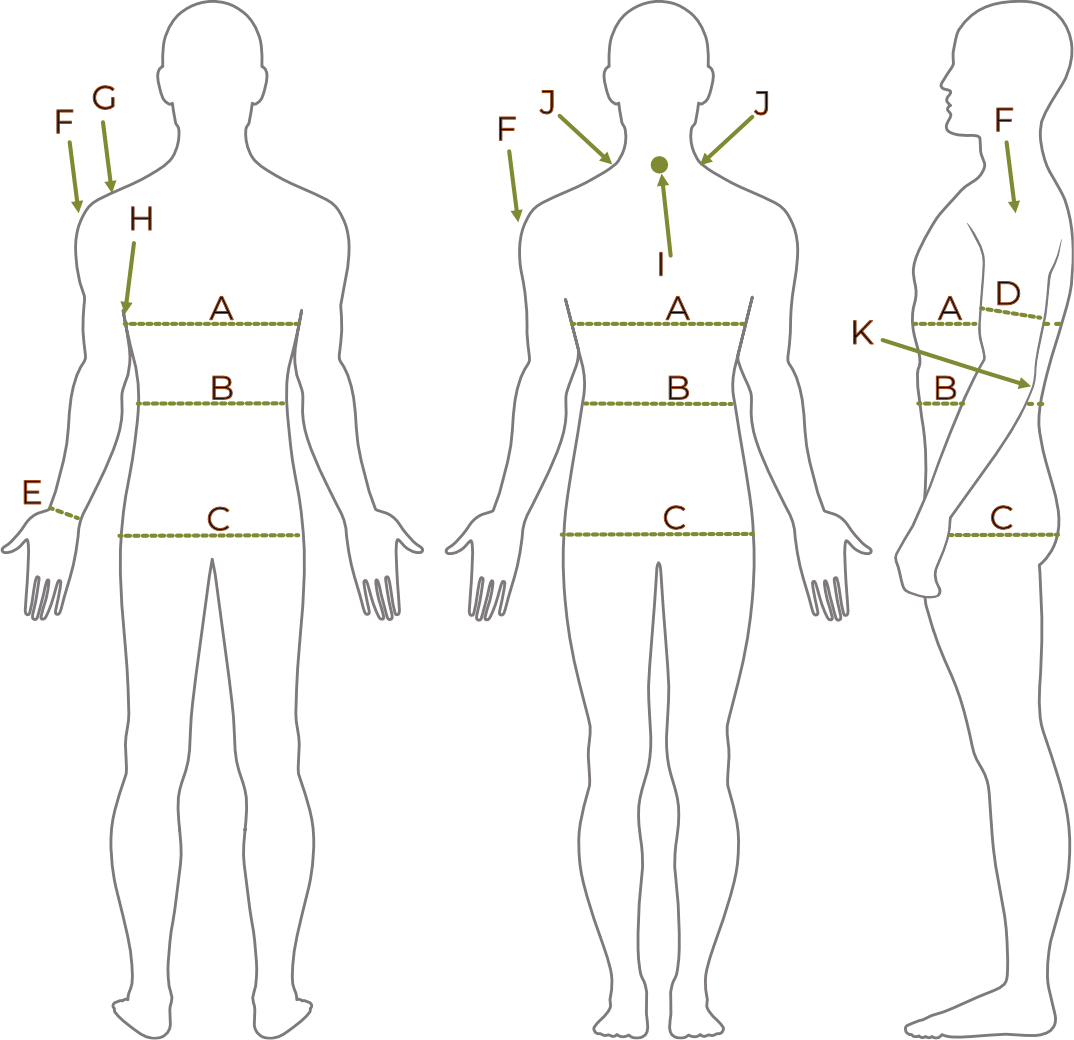
Measuring points are shown on the charts below, and you can record your own measurements on the following page. You can compare these to the standard measurements given in the shape blocks provided from our Find Out More About Designing page.
Measuring points

Image credit: Alison Peck

Image credit: Alison Peck
| Marker | Description |
|---|---|
| A | Widest part of bust/chest. |
| B | Natural waistline (unless style of garment dictates a different position). |
| C | Widest part of hips. |
| D | Circumference of upper arm at widest point. |
| E | Circumference of wrist. |
| F | Outside edge of the shoulder bone. |
| G | Inside edge of the shoulder bone. |
| H | Armpit. |
| I | Back of neck (often a slightly prominent bone). |
| J | Where shoulder meets neck. |
| K | Elbow joint. |
Your measurements
| Measurements | Actual size | Ease (see below) | Finished size |
|---|---|---|---|
| Chest/bust (A) | |||
| Waist (B) | |||
| Circumference of wrist (E)1 | |||
| Shoulder width (across the back, from F on one arm to F on the other) | _______ | ||
| Armhole depth (circumference, also called ‘scye’, from G round to H and back up to G)2 | |||
| Back neck width (from J on one side to J on the other side)3 | |||
| Front neck drop (measure from J straight down to the position of the bottom of the neckline) | _______ | ||
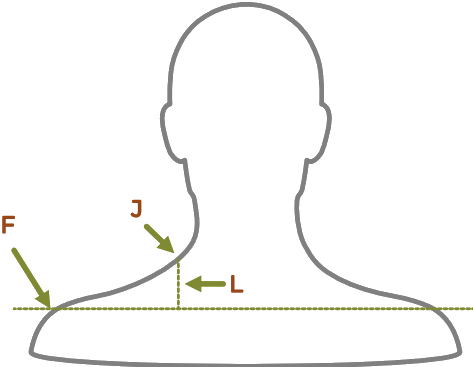
| Shoulder drop (L, see diagram below) | _______ | ||
| Arm length (from G, down the outside of the arm when slightly bent, over K, down to E)4 | _______ | ||
| Neck to waistline (from I down to B)5 | _______ | ||
| Waistline to hem (from B down to garment hem)5 | _______ | ||
| Garment length (from I down to garment hem)6 | _______ |
Notes
- For short-sleeved garments, measure the circumference of the arm where the sleeve ends.
- Sleeveless garments need more ease adding to the armhole as there is often a hem or welt of some sort.
- This will also be the front neck width, and although there is no ‘ease’ for movement, and adjustment may be needed depending on style (crew / round / polo / boat / v-neck).
- For short-sleeved garments, measure from down the arm in the same way but stop at the desired sleeve length.
- Only required if there is some feature at waistline (for example, a band of pattern at the waist, or ribbing). For waistline to hem, this would be the length of a skirt.
- However long you want the garment to be, and will vary considerably between a cropped top and a long-line jerkin or dress, for example.

The shoulder drop is the difference between where the shoulders join the neck (J) and the imaginary horizontal line drawn between the outside edges of the bone at the top of each arm (F on each side). The shoulder slope runs from F to J, making the long side of the triangle.
How much ease to add?
The amount of ease you need to add depends very much on the style of garment you are making, and the fit you want. For example, a traditional fairly close-fit raglan or fitted sleeve jumper used to add approximately 5cm (for a child size) to 10cm (adult) to the overall chest measurement. This allowed enough room for movement, but that’s all. Think of the photographs on the front of knitted patterns.
A more casual fit is achieved by adding more ease, and more is needed for drop-shoulder garments, too, because of the ‘pull’ on the garment when the wearer moves. One way of determining an approximate value is to measure a garment that feels comfortable to the wearer in a similar style. Another is to check commercial patterns to see the difference between measurements and finished size.
There is no point in calculating ease for each measurement for garments that have no shaping. For example, a stocking stitch jumper knitted with straight side seams needs to be wide enough to cover the chest (and hips, depending on length). If your chest measures 92cm and you are adding 14cm for ease (giving a finished size of 106cm) then as long as the waist and hips measurements fit comfortably within that (with plenty of room for movement), the chest measurement is the only one of the three you need. But do check. If the hip measurement is significantly larger than the chest, you either have to make the overall garment larger or introduce some shaping to start wider and end narrower. Remember that knitted and crocheted garments do tend to have quite a bit of ‘give’ so are quite forgiving of small differences.
Although body measurements are usually the smallest that the finished measurement should be, it is possible to have ‘negative’ ease. So, when calculating a skinny rib jumper, you may want negative ease so that the jumper hugs the body.
Some measurements (lengths: arm length, sleeve length, neck to waist length, waist to hem length and overall finished length) do not require any ease at all.
A series of body blocks (basic shapes) are available for various jumper styles that give
standard measurements (with suggested ease) for a range of sizes. You can, of course,
increase the ease amount.
Download the diagrams and table here to add your own measurements and help with your calculations.

